Using git subtree to deploy a dist folder

I have a simpler version here 🙂 http://www.yeahshecodes.com/git/a-simple-git-subtree-tutorial

Defining the problem

We have to deploy code from within a VPN environment. This has meant we are reliant on a proxy to access external links. This has proven to be messy, and we often spend over a day trying to deploy a project from within the VPN and attempting to connect to external resources (npm, bower, github etc).

Additionally our vpn users have a data allowance which is capped.

Some problems we had to solve for:

  • We need to be able to deploy code without relying on a proxy and without getting restricted by a data allowance.
  • We need to be able to deploy to more than one environment, eg a staging environment and a production environment.
  • We need to deploy a “dist” folder that is in the .gitignore file and not push to our repo on github, only to the server we want to deploy from.
  • We did not want to use tcp to just copy files over, we wanted something more structured than that.
  • Write an ansible script that will automate the process (not covered in this post)

Deciding on a solution

Git subtrees sounded like a good solution. I glanced over basic tutorials and skim read through some resources.

I went through a few attempts to use subtrees and realised no one pointed out how NOT to use subtrees, and this left me spending a considerable amount of time doing the wrong thing. So here is a quick run down of what not to do. And then what you can do instead.

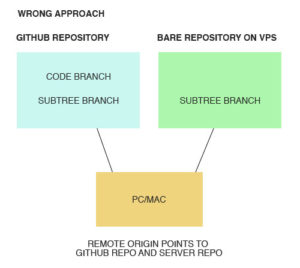
Wrong approach

I have to emphasise that this proved to be a wrong approach to using subtrees. Move a specific folder into a subtree within the same repo AND to an external repo.

I added two destinations to my origin remote, so that when I committed I push my changes from a folder “dist” into a subtree on my current repo and a repo on a different server.

WRONGAPPROACH

After a lot of struggling I realised this was the wrong approach.

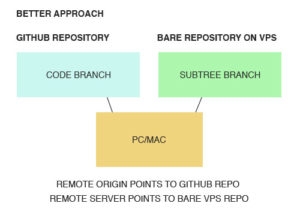
Better approach

From origin repo push a specific folder into a subtree of an external repo only.

Have two remotes, one will be “origin” and one will be “server”. When I push the subtree, I want to push it to “server” when I commit my working/source code I want that to push to the origin (aka github).

Both remotes can be hosted on github, in our case we have 1 github hosted account and 1 bare git repo on a private server we manage.

I set up a bare repo on a private server, that could only be accessed when you were logged in on the vpn.

BETTERAPPROACH

The approach in motion

Setting up a bare github repo

On a server go to the folder you want to keep your bare repos.

Hint: the command “pwd” will tell you the file path where you currently are.

Then run this command

1
git init --bare REPONAME.git

Replace REPONAME with the name you want to give the repo

This will create a folder in the folder you are currently located.

Eg /REPONAME.git/

Then go into that folder:

1
cd REPONAME.git

And run

1
git symbolic-ref HEAD

This sets the heads of the repo (else you will keep getting an error when you try use this bare repo).

Preparing to use git subtree

Now you have a location for the subtree. As mentioned you can use a github hosted repo as your location, copy that location.

In our case, because we are using a private server for our subtree we will use ssh to access the location.

1
[ssh_username]@[ip_address_or_domain]:/file/path/to/repo/from/root/REPONAME.git

You will need to replace the following values with your own:

  • ssh_username
  • ip_address_or_domain
  • /file/path/to/repo/from/root/
  • REPONAME.git

Add a new remote

1
git remote add [remote-name] [location]

eg

1
git remote add server [email protected]:/file/path/to/repo/from/root/REPONAME.git

Updating an existing remote

If you already have added the remote. And you want to set the url of that remote (not origin, a different one that is separate to your main project). Then you will use this command to set the the remote url:

1
git remote set-url [remote-name] [location]

e.g.

1
 git remote set-url server [email protected]:/file/path/to/repo/from/root/REPONAME.git

I have chosen to call the remote “server” you can call it whatever you choose, just not origin, as origin is your original github project you are pushing from.

If you type this to see your current remotes

1
git remote —v

You will see your current origin values pointing to your current repo.

Add the server remote:

1
git remote set-url server [ssh_username]@[ip_address_or_domain]:/file/path/to/repo/from/root/REPONAME.git

Replacing the values as mentioned above.

Now you can insert again

1
git remote —v

And you will see your origin and your server locations.

Do not set the remote origin to two locations (this is a mistake I did at first). You should not use your existing origin for two different locations (in this case at least). Remote origin should only be pointing to your current github repo (not the subtree repo).

Some notes on subtrees

The environments are now prepared for subtrees.

In your project decide what folder you want to move into the subtree. In our case we wanted to use “/dist” in the root of our repo.

If you want to use a subtree in a sub folder structure, you need to reference the folder using that subtree path. Eg “files/app/dist”

I’ve seen a youtube video of a wordpress project referencing a plugin using a subtree. This meant they pointed to the wordpress plugins folder and then the specific plugin they wanted to subtree into the project. “wp-content/plugins/plugin-folder”

Using git subtree

If you type in this command, you will see the following help information

1
git subtree -h

usage: git subtree add   –prefix=<prefix> <commit>

   or: git subtree add   –prefix=<prefix> <repository> <ref>

   or: git subtree merge –prefix=<prefix> <commit>

   or: git subtree pull  –prefix=<prefix> <repository> <ref>

   or: git subtree push  –prefix=<prefix> <repository> <ref>

   or: git subtree split –prefix=<prefix> <commit…>

    -h, –help            show the help

    -q                    quiet

    -d                    show debug messages

    -P, –prefix …      the name of the subdir to split out

    -m, –message …     use the given message as the commit message for the merge commit

options for ‘split’

    –annotate …        add a prefix to commit message of new commits

    -b, –branch …      create a new branch from the split subtree

    –ignore-joins        ignore prior –rejoin commits

    –onto …            try connecting new tree to an existing one

    –rejoin              merge the new branch back into HEAD

options for ‘add’, ‘merge’, and ‘pull’

    –squash              merge subtree changes as a single commit

The main commands to keep in mind:

1
2
3
git subtree add —prefix [path_to_folder]
git subtree pull —prefix [path_to_folder] [remote] [remote-branch]
git subtree push —prefix [path_to_folder] [remote] [remote-branch]

Eg (remember I called the remote server above, you can call it anything you prefer):

1
2
3
git subtree add —prefix dist
git subtree pull —prefix dist server staging-dist
git subtree push —prefix dist server staging-dist

I have chosen to push to branches using the naming convention “origin-branch”-“folder”. “staging-dist” is the name of the subtree, but it is also the branch that the subtree will exist in.

So the branches I would subtree from would be staging (for staging deploys) and master (for production deploys)

One of the problems we had to solve using this approach was not deploying “dist” to our main repo. With subtrees, you can deploy code there without deploying that code to your main repo.

From within the project, “dist” is added to .gitignore

Then when your dist folder is ready for deploy (usually after running “grunt build”) you can force commit dist using -f.

First you will need to add your subtree (if you have not already)

1
git subtree add —prefix dist

Then add your dist files and commit them (do not push to your current branch, only push to the subtree)

1
2
git add dist -f
git commit -am “Added the dist files”

Then push to the subtree

1
git subtree push —prefix dist server staging-dist

If you have an existing subtree with files you will need to pull first by running

1
git subtree pull —prefix dist server staging-dist

Again, just replacing the values as you need to (mentioned above).

Deploying from the subtree

So now we have code in a subtree, we just need to push those files to the location you need them. I won’t go into how to setup nginx to point to this location, that will be for another post, but if you do want to learn how to do that just google using nginx for file management.

If you want to automate that when you push to the subtree your files are pushed to the right location, you can read through this digital ocean post

https://www.digitalocean.com/community/tutorials/how-to-set-up-automatic-deployment-with-git-with-a-vps

I would not recommend that approach for a production project, but perhaps for a staging one. I will always enforce a manual deploy step for production using a system like jenkins.

For this project I created an ansible script that would be run by jenkins in order to deploy.

1
2
3
4
5
- name: Checkout git repo into destination
git: repo=/file/path/to/repo/from/root/{{repo_name}}
dest=file/path/to/destination/from/root/{{repo_dest}}
version={{github_branch}}
force=yes

This script makes sure the files in the repo, in the subtree branch (e.g. staging-dist) gets copied to the location required.

Questions?

This process took me a little while to wrap my head around. Especially going down the wrong path at first, and then going back and relooking the solution.

The solution should always feel like it fits. And this second approach fitted for our project.

This post focused on subtrees, but the overall solution required ansible, nginx, a private server, git and github.

If you have any questions (or suggested improvements) feel free to pop them in the comments section.

Onwards, to more solutions.

Setup karma and jasmine for front end unit testing

Jasmine is a great unit testing tool for angular and for javascript. You have the ability to run your unit tests through chrome, firefox, phantomjs and several more.

For this post I’ll be setting up the jasmine environment to run through firefox, chrome and then the ghost browser: phantomjs.

Prerequisites

Make sure you have npm installed

Install karma and karma-cli globally (remove -g if you just want it locally)

npm install -g karma
npm install -g karma-cli

Setup your package.json file

In a new folder create your package.json file by running:

npm install init (insert your project details)

Install packages using npm

npm install karma –save-dev
npm install karma-jasmine –save-dev
npm install karma-firefox-launcher –save-dev
npm install karma-chrome-launcher –save-dev
npm install karma-phantomjs-launcher –save-dev

The –save-dev will indicate to npm that it should add this library as a dependency in your package.json file.

You will see the following content added to package.json

“devDependencies”: {
“jasmine-core”: “^2.3.4”,
“karma”: “^0.13.12”,
“karma-
chrome-launcher”: “^0.2.1”,
“karma-firefox-launcher”: “^0.1.6”,
“karma-jasmine”:
“^0.3.6”,
“karma-phantomjs-launcher”: “^0.2.1”,
“phantomjs”: “^1.9.18”
},

Add the karma configuration file

To generate your karma.conf.js file, run the following command:

karma init karma.conf.js

Then follow the following setup process:

Do you want to capture any browsers automatically?

PhantomJS
Chrome
Firefox

What is the location of your source and test file?

test/unit/**/*Spec.js


There is not file matching this pattern. (Add a test/unit/TestSpec.js, make sure you
have the folders test/unit set up)

Test that it runs

in your file, TestSpec.js add:

describe(‘Hello moo’, function () {
it(‘Goes baa’, function() {

});
});

Then run

karma start karma.conf.js

Phantomjs will run, then Chrome broswer will open up, Firefox browser will open up.

Karma should say:
PhantomJS 1.9.8 (Windows 8 0.0.0) is idle
Chrome 46.0.2490 (Windows 8.1 0.0.0) is idle
Firefox 41.0.0 (Windows 8.1 0.0.0) is idle
You will see in your command line: Executed 1 of 1 SUCCESS.

(If there’s no success you may have a typo in your test js file)

Done

You now have your testing environment configured.

Read about the types of tests you can write on the jasmine documentation website, http://jasmine.github.io/.

Adding a sqlite3 database in Windows

Edit your php.ini

Uncomment in php.ini by removing the semi-colon ‘;’ :

extension=php_sqlite3.dll

Save and restart your apache.

Some tutorials mention also adding:
extension=php_pdo.dll

But this didn’t work for me.

If you receive the error:

PHP Startup: Unable to load dynamic library ‘C:\xampp\php\ext\php_pdo.dll’ – The specified module could not be found.

Just comment out the ddl:

;extension=php_pdo.dll

Adding the sqlite3 database

Go to the folder you would like to add your sqlite database, then run

sqlite3

Make sure that the location of where your sqlite3 executable is located is added in your environment variables.

Which will start an sqlite3 interface up. In there type:

.open database.sqlite

With ‘database.sqlite’ being your database file name. Make it whatever you would like it to be.

To exit the interface click “ctrl + c”.

Now you will see a newly created file in your directory.

Scaffold a laravel api

This is a quick scaffold solution for setting up a simple laravel api.

This tutorial does not include more advanced api requirements such as user authentication or a database connection. It also does not indicate how to send data through the api.

Prerequisites

You must have php installed on your system and have composer set up.

You will need to use the command line, so some command line knowledge is required.

Add laravel

Use composer to add the laravel installer through the command tool

composer global require “laravel/installer=~1.1”

See the documentation here

In your command line tool, navigate to the folder you would like to place the laravel project and insert the below

laravel new api

The last word, “api”, can be whatever you want to project to be named.

A folder will have been created called api and in that folder will be a fresh install of laravel.

Check your laravel installed successfully by running the following statement in your command line tool:

php artisan serve

That should open a website with the address: http://localhost:8000

If you do not see that, or can not access the laravel site on that url, you will need to check that all the prerequisites are installed properly before continuing.

Adding the api end points

To create your api end points you will need to edit the routes.php files. This file will be in app/Http/

Add these lines of code:

Route::get('/test/', array('uses' => 'APIController@doThisTest'));

Route::get('/anothertest/', array('uses' => 'APIController@doAnotherTest'));

In the code this part array(‘uses’ => ‘APIController@doThisTest’) indicates that it will use a controller called APIController and use a method called doThisTest.

You now need to create a controller called APIController.

In app/Http/Controllers/ create a file called APIController.php and add the following code:

<?php

namespace App\Http\Controllers;

class APIController extends Controller {

    public function doThisTest() {
      return "Hello world";
    }

    public function doAnotherTest() {
      return "Hello moo";
    }

}

Viewing the api

This code will have created two endpoints:

  • http://localhost:8000/test/
  • http://localhost:8000/anothertest/


Summary

That’s the start. You can extend the api further by adding user authentication and create an interface for inputting data through the api.

Scaffold sandbox code with npm

Create a sandbox code project to test code. Add one package or more to test in isolation.

The purpose of this sandbox is not to be used. The sandbox is for testing and the code should not be kept. This will give you a ‘go to’ environment to do some gun slinging code without fear of breaking a project.

Use this environment to get confident with new code or test logic in isolation before adding it to a project.

This blog post will use underscore as the sandbox package.

Prerequisites

Node.js must be installed and have npm set up.

You will need to use the command line, so some command line knowledge is required.

Create the sandbox

Create a folder for all the sandboxes, eg “Sandboxes”.

In that folder create the sandbox folder. Make it intuitive so that you know what that sandbox is for.

As an example, create a folder called “underscore”.

You should have this folder structure:

Sandboxes

– underscore

Create template files

Have a folder for template files. In this file you will want to keep blank files that you can copy and paste into your sandboxes as you need.

For example you will need an index.html file to run the script in. Create a bank html5 template that you can copy and paste and tweak.

These files will be useful to have in the templates folder:

  • index.html
  • style.css
  • script.js

NPM

Add your library into your sandbox by using npm. In your command tool, navigate to the sandbox folder, type in the following:

npm install [package]

In the underscore folder you would run: npm install underscore.

You will see a node_modules folder with the package inside.

Set the sandbox up

Once the package is installed, add an index.html file. Copy/create a blank index.html file into the sandbox. Add the javascript and stylesheet references.

<script src=”node_modules/underscore/underscore-min.js“></script>

Get coding

Run the index.html file in a browser.

For quick code open up the console. For most browsers this is F12 (if using a pc). You now have access to the package, and freedom to test code.

Add a script.js file if you want to keep adding to code and refreshing.

Run example underscore code:

Some fake data

var characters = [{
id: 1,
name: 'Eddard',
surname: 'Stark',
house: 'Stark',
children: [3, 4, 5, 6, 7, 8]
},{
id: 2,
name: 'Catelyn',
surname: 'Stark',
house: 'Stark',
children: [3, 4, 5, 6, 7]
},{
id: 3,
name: 'Robb',
surname: 'Stark',
house: 'Stark'
},{
id: 4,
name: 'Sansa',
surname: 'Stark',
house: 'Stark'
},{
id: 5,
name: 'Arya',
surname: 'Stark',
house: 'Stark'
},{
id: 6,
name: 'Bran',
surname: 'Stark',
house: 'Stark'
},{
id: 7,
name: 'Rickon',
surname: 'Stark',
house: 'Stark'
},{
id: 8,
name: 'Jon',
surname: 'Snow',
house: 'Stark'
}];

Practice using underscore

var starks = _.filter(characters, function(character) { return character.surname == 'Stark'});

var notStark = _.reject(characters, function(character) { return character.surname == 'Stark'});

var eddard = _.first(_.where(characters, {name: 'Eddard'}));
var catelyn = _.first(_.where(characters, {name: 'Catelyn'}));

var houses = _.pluck(characters, 'house');

var surnames = _.pluck(characters, 'house');

var eddardChildren = _.filter(characters, function(character) {
return _.contains(eddard.children, character.id)
});

var catelynChildren = _.filter(characters, function(character) {
return _.contains(catelyn.children, character.id);
});

var otherChild = _.difference(eddardChildren, catelynChildren);

Why use this approach?

I often find myself wanting to test a package in isolation from a project. There is a lot of freedom to experiment and learn other avenues of coding.