Javascript inheritance

Thoughts and notes on inheritance in javascript.

You can use the built in .call() method to extend a javascript class.

Syntax:

1
2
3
4
var InheritClass = function() {}
var YourClass = function() {
InheritClass.call(this);
}

An example with “Animal”. Inherit an Animal class inside a Cow class.

Remember to create a new instance of Cow. Only in the object instance can you call the methods and properties.

1
2
3
4
5
6
7
8
9
10
11
12
13
14
15
16
17
18
19
20
21
22
23
24
25
var Animal = function() {
this.speak = "no speak set";
this.food = "no food set";
this.action;
this.says = function() {
console.log(this.speak);
};
this.eats = function() {
console.log(this.food);
};
};
var Cow = function () {
Animal.call(this);
};
// Cow.says(); // This wont work
//You have to create a new object as indicated below
var Bessie = new Cow();
//You will see the default values
Bessie.says();
Bessie.eats();
Bessie.speak = "Moo";
Bessie.food = "Hay";
//You see your newly set values
Bessie.says();
Bessie.eats();

So can you use the same concept to inherit from multiple classes? Yes.

You can inherit from multiple classes and keep adding to the current class.

Eg

1
2
3
4
5
6
7
8
9
10
11
12
13
14
15
16
17
18
19
20
21
22
23
24
25
26
27
28
29
30
31
32
33
34
var Animal = function() {
this.speak = "no speak set";
this.food = "no food set";
this.action;
this.says = function() {
console.log(this.speak);
};
this.eats = function() {
console.log(this.food);
};
this.actions = function() {
console.log(this.action);
};
};
var Farm = function() {
this.farm = "no farm";
this.whichFarm = function() {
console.log(this.farm);
};
};
var Cow = function () {
Animal.call(this);
Farm.call(this);
};
var Bessie = new Cow();
Bessie.says();
Bessie.eats();
Bessie.whichFarm();
Bessie.speak = "Moo";
Bessie.food = "Hay";
Bessie.farm = "Old Mc Donald's";
Bessie.says();
Bessie.eats();
Bessie.whichFarm();

Angular Unit Tests for Promise Chains that use .then()

A quick and simple way to test promises and then methods is to use $q.resolve()

I tried very complicated approaches including using $httpBackend, but in the end there was this very lightweight and simple solution to test promises in angular.

Use spyOn.and.returnValue and return $q.resolve() with scope.$digest()

Syntax:

1
2
3
spyOn(object, ‘method’).and.returnValue($q.resolve(data));

scope.$digest();

Data can be anything, a primitive value or an object for example.

Remember to use scope.$digest() to trigger it.

Converting to Angular 1.5: from directives to components

We are busy upgrading our projects to Angular 1.5 in preparation for Angular 2.

Here is a quick walkthrough of converting a basic angular directive to component.

Angular Directive

1
2
3
4
5
6
7
8
9
10
11
12
13
angular.module(‘app’).directive(‘contactForm’, function() {
    return {
        email: ‘=?’,
        name: ‘@’,
        surname: ‘@’
    },
    controller: function($scope, sendEmail) {
        $scope.send = function() {
            sendEmail.send($scope.email, $scope.name, $scope.surname);
        };
    },
    templateUrl: ‘views/templates/contactForm.html’
});

I have, in this example, made email a two way data binding, and name and surname just strings.

Template

Contact Form template

1
2
3
4
5
6
7
8
9
10
11
12
13
14
15
16
17
18
<div class="form-wrapper">

    <form>
    <p>
        <label$gt;Email</label>
        <input type=“text” name=“email” ng-model="email" />
    </p>
    <p>
        label>Name</label>
        <input type=“text” name=“name” ng-model=“name />
    </p>
    <p>
        <label>Surname</label>
        <input type=“text” name=“surname” ng-model=“surname” />
    </p>
    </form>

</div>

Calling the directive in another view:

Directive bindings:

  • @ String
  • & One-way Binding
  • = Two-way Binding

Component

Step 1:

Replace “.directive” with “.component”

Step 2:

Don’t pass a function as the second argument, pass an object with fields

You should now have

1
2
3
angular.module(‘app’).component(‘contactForm’, {
    …
});

Note the { … } instead of the function() {…}

Step 3:

Bind variables using “bindings: { .. }” instead of “scope: { … }”

You should now have

1
2
3
4
5
6
7
angular.module(‘app’).component(‘contactForm’, {
    bindings: {
        email: ‘=?’,
        name: ‘@’,
        surname: ‘@’
    }
});

Component binding types:

  • = Two-way Binding
  • < One-way Binding
  • @ String
  • & Callbacks (to output to parent scope)

Step 4:

Add controller, similar to directives, except you no longer pass in $scope. The variables bind on “$ctrl” the default value for controllerAs.

You can assign controllerAs to any value, but for this example it is unnecessary.

1
2
3
4
5
6
7
8
9
10
11
12
13
14
15
16
angular.module(‘app’).component(‘contactForm’, {
    bindings: {
        email: ‘=?’,
        name: ‘@’,
        surname: ‘@’
    },
    controller: function(sendEmail) {
   
        var $ctrl = this;

        $ctrl.send = function() {
            sendEmail.($ctrl.email, $ctrl.name, $ctrl.surname);
        }
    },
    templateUrl: "/path/to/template/feature.template.html"
});

Note

1
var $ctrl = this;

Explicitly give $ctrl the controller’s scope.

Replace $scope with $ctrl. In the template you will have to reference each variable with $ctrl. Eg {{$ctrl.email}}

Contact Form template

1
2
3
4
5
6
7
8
9
10
11
12
13
14
15
16
17
18
<div class="form-wrapper">

    <form>
    <p>
        <label$gt;Email</label>
        <input type=“text” name=“email” ng-model="$ctrl.email" />
    </p>
    <p>
        label>Name</label>
        <input type=“text” name=“name” ng-model=“$ctrl.name" />
    </p>
    <p>
        <label>Surname</label>
        <input type=“text” name=“surname” ng-model=“$ctrl.surname” />
    </p>
    </form>

</div>

Using git subtree to deploy a dist folder

I have a simpler version here 🙂 http://www.yeahshecodes.com/git/a-simple-git-subtree-tutorial

Defining the problem

We have to deploy code from within a VPN environment. This has meant we are reliant on a proxy to access external links. This has proven to be messy, and we often spend over a day trying to deploy a project from within the VPN and attempting to connect to external resources (npm, bower, github etc).

Additionally our vpn users have a data allowance which is capped.

Some problems we had to solve for:

  • We need to be able to deploy code without relying on a proxy and without getting restricted by a data allowance.
  • We need to be able to deploy to more than one environment, eg a staging environment and a production environment.
  • We need to deploy a “dist” folder that is in the .gitignore file and not push to our repo on github, only to the server we want to deploy from.
  • We did not want to use tcp to just copy files over, we wanted something more structured than that.
  • Write an ansible script that will automate the process (not covered in this post)

Deciding on a solution

Git subtrees sounded like a good solution. I glanced over basic tutorials and skim read through some resources.

I went through a few attempts to use subtrees and realised no one pointed out how NOT to use subtrees, and this left me spending a considerable amount of time doing the wrong thing. So here is a quick run down of what not to do. And then what you can do instead.
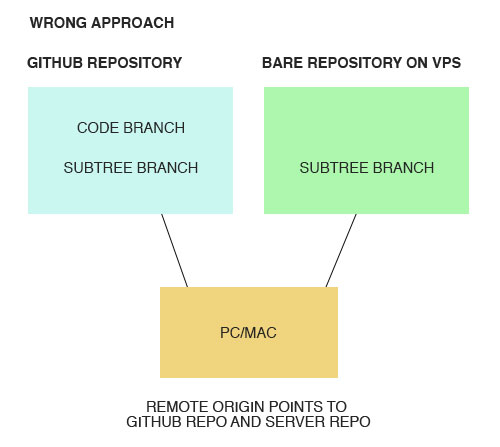
Wrong approach

I have to emphasise that this proved to be a wrong approach to using subtrees. Move a specific folder into a subtree within the same repo AND to an external repo.

I added two destinations to my origin remote, so that when I committed I push my changes from a folder “dist” into a subtree on my current repo and a repo on a different server.

WRONGAPPROACH

After a lot of struggling I realised this was the wrong approach.
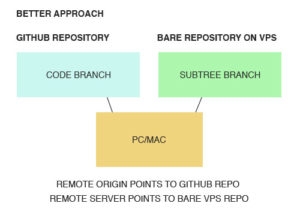
Better approach

From origin repo push a specific folder into a subtree of an external repo only.

Have two remotes, one will be “origin” and one will be “server”. When I push the subtree, I want to push it to “server” when I commit my working/source code I want that to push to the origin (aka github).

Both remotes can be hosted on github, in our case we have 1 github hosted account and 1 bare git repo on a private server we manage.

I set up a bare repo on a private server, that could only be accessed when you were logged in on the vpn.

BETTERAPPROACH

The approach in motion

Setting up a bare github repo

On a server go to the folder you want to keep your bare repos.

Hint: the command “pwd” will tell you the file path where you currently are.

Then run this command

1
git init --bare REPONAME.git

Replace REPONAME with the name you want to give the repo

This will create a folder in the folder you are currently located.

Eg /REPONAME.git/

Then go into that folder:

1
cd REPONAME.git

And run

1
git symbolic-ref HEAD

This sets the heads of the repo (else you will keep getting an error when you try use this bare repo).

Preparing to use git subtree

Now you have a location for the subtree. As mentioned you can use a github hosted repo as your location, copy that location.

In our case, because we are using a private server for our subtree we will use ssh to access the location.

1
[ssh_username]@[ip_address_or_domain]:/file/path/to/repo/from/root/REPONAME.git

You will need to replace the following values with your own:

  • ssh_username
  • ip_address_or_domain
  • /file/path/to/repo/from/root/
  • REPONAME.git

Add a new remote

1
git remote add [remote-name] [location]

eg

1
git remote add server [email protected]:/file/path/to/repo/from/root/REPONAME.git

Updating an existing remote

If you already have added the remote. And you want to set the url of that remote (not origin, a different one that is separate to your main project). Then you will use this command to set the the remote url:

1
git remote set-url [remote-name] [location]

e.g.

1
 git remote set-url server [email protected]:/file/path/to/repo/from/root/REPONAME.git

I have chosen to call the remote “server” you can call it whatever you choose, just not origin, as origin is your original github project you are pushing from.

If you type this to see your current remotes

1
git remote —v

You will see your current origin values pointing to your current repo.

Add the server remote:

1
git remote set-url server [ssh_username]@[ip_address_or_domain]:/file/path/to/repo/from/root/REPONAME.git

Replacing the values as mentioned above.

Now you can insert again

1
git remote —v

And you will see your origin and your server locations.

Do not set the remote origin to two locations (this is a mistake I did at first). You should not use your existing origin for two different locations (in this case at least). Remote origin should only be pointing to your current github repo (not the subtree repo).

Some notes on subtrees

The environments are now prepared for subtrees.

In your project decide what folder you want to move into the subtree. In our case we wanted to use “/dist” in the root of our repo.

If you want to use a subtree in a sub folder structure, you need to reference the folder using that subtree path. Eg “files/app/dist”

I’ve seen a youtube video of a wordpress project referencing a plugin using a subtree. This meant they pointed to the wordpress plugins folder and then the specific plugin they wanted to subtree into the project. “wp-content/plugins/plugin-folder”

Using git subtree

If you type in this command, you will see the following help information

1
git subtree -h

usage: git subtree add   –prefix=<prefix> <commit>

   or: git subtree add   –prefix=<prefix> <repository> <ref>

   or: git subtree merge –prefix=<prefix> <commit>

   or: git subtree pull  –prefix=<prefix> <repository> <ref>

   or: git subtree push  –prefix=<prefix> <repository> <ref>

   or: git subtree split –prefix=<prefix> <commit…>

    -h, –help            show the help

    -q                    quiet

    -d                    show debug messages

    -P, –prefix …      the name of the subdir to split out

    -m, –message …     use the given message as the commit message for the merge commit

options for ‘split’

    –annotate …        add a prefix to commit message of new commits

    -b, –branch …      create a new branch from the split subtree

    –ignore-joins        ignore prior –rejoin commits

    –onto …            try connecting new tree to an existing one

    –rejoin              merge the new branch back into HEAD

options for ‘add’, ‘merge’, and ‘pull’

    –squash              merge subtree changes as a single commit

The main commands to keep in mind:

1
2
3
git subtree add —prefix [path_to_folder]
git subtree pull —prefix [path_to_folder] [remote] [remote-branch]
git subtree push —prefix [path_to_folder] [remote] [remote-branch]

Eg (remember I called the remote server above, you can call it anything you prefer):

1
2
3
git subtree add —prefix dist
git subtree pull —prefix dist server staging-dist
git subtree push —prefix dist server staging-dist

I have chosen to push to branches using the naming convention “origin-branch”-“folder”. “staging-dist” is the name of the subtree, but it is also the branch that the subtree will exist in.

So the branches I would subtree from would be staging (for staging deploys) and master (for production deploys)

One of the problems we had to solve using this approach was not deploying “dist” to our main repo. With subtrees, you can deploy code there without deploying that code to your main repo.

From within the project, “dist” is added to .gitignore

Then when your dist folder is ready for deploy (usually after running “grunt build”) you can force commit dist using -f.

First you will need to add your subtree (if you have not already)

1
git subtree add —prefix dist

Then add your dist files and commit them (do not push to your current branch, only push to the subtree)

1
2
git add dist -f
git commit -am “Added the dist files”

Then push to the subtree

1
git subtree push —prefix dist server staging-dist

If you have an existing subtree with files you will need to pull first by running

1
git subtree pull —prefix dist server staging-dist

Again, just replacing the values as you need to (mentioned above).

Deploying from the subtree

So now we have code in a subtree, we just need to push those files to the location you need them. I won’t go into how to setup nginx to point to this location, that will be for another post, but if you do want to learn how to do that just google using nginx for file management.

If you want to automate that when you push to the subtree your files are pushed to the right location, you can read through this digital ocean post

https://www.digitalocean.com/community/tutorials/how-to-set-up-automatic-deployment-with-git-with-a-vps

I would not recommend that approach for a production project, but perhaps for a staging one. I will always enforce a manual deploy step for production using a system like jenkins.

For this project I created an ansible script that would be run by jenkins in order to deploy.

1
2
3
4
5
- name: Checkout git repo into destination
git: repo=/file/path/to/repo/from/root/{{repo_name}}
dest=file/path/to/destination/from/root/{{repo_dest}}
version={{github_branch}}
force=yes

This script makes sure the files in the repo, in the subtree branch (e.g. staging-dist) gets copied to the location required.

Questions?

This process took me a little while to wrap my head around. Especially going down the wrong path at first, and then going back and relooking the solution.

The solution should always feel like it fits. And this second approach fitted for our project.

This post focused on subtrees, but the overall solution required ansible, nginx, a private server, git and github.

If you have any questions (or suggested improvements) feel free to pop them in the comments section.

Onwards, to more solutions.

Javacript: More functional, less object oriented

A colleague pointed out that when I program in javascript I’m trying to force object oriented programming onto javascript. Rather than keeping with the javascript style of programming. The main problem is I rely on the “new” keyword in my javascript code.

The scenario:

I want a base object, DataInterface, that can handle api methods and data.

I have reusable methods that are interfaced, and then I want to be able to extend “DataInterface” and have the endpoint updated for each instance of the class.

The ideas:

It can be further debated whether this is the right solution for the scenario, but below is the outcome of the discussion:

DataInterface class with methods:

Eg:

1
2
3
4
var DataInterface = function() {
    this.getAll : function() {}; //just an example
    this.getByField : function(field, value) {}; //just an example
}

And this base object has an api endpoint attribute

Eg:

1
2
3
var DataInterface = function() {
    this.endpoint = ‘/endpoint’;
}

Then I want to extend off of this object and have specific data sets,

Eg

1
2
Products.endpoint = ‘one’;
Leads.endpoint = ‘two’;

And then Products and Leads can have additional extended methods, but they inherit the same original behavior from the base class.

The focus:

I am going to focus on just updating the endpoint for two instances of DataInterface, and exclude any methods:

What I originally wrote:

1
2
3
4
5
6
7
8
9
10
11
12
13
14
15
16
17
18
var DataInterface = function() {
    var endpoint;
    this.setEndpoint = function(_endpoint) {
        endpoint = _endpoint;
    };
    this.getEndpoint = function() {
        return endpoint;
    };
    return this;
}

var ProposalService = new DataInterface();
var ProductService = new DataInterface();
ProposalService.setEndpoint('one');
ProductService.setEndpoint('two');

console.log(ProposalService.getEndpoint());
console.log(ProductService.getEndpoint());

What this will output is ‘one’, and then ‘two’ in the console. Two instances of the DataInterface has been created with two unique endpoints.

Out with the new

However, if you remove the “new” keyword, which would make it more “javascript-like”:

Using the same class, but removing “new”.

1
2
3
4
5
6
var ProposalService = DataInterface();
var ProductService = DataInterface();
ProposalService.setEndpoint('one');
ProductService.setEndpoint('two');
console.log(ProposalService.getEndpoint());
console.log(ProductService.getEndpoint());

What will happen now is the console will print out ‘two’, ‘two’. Instead of two instances, we have the same instance being pointed to by 2 variables. So the endpoint is not unique.

In comes the factory pattern

So if we rewrite the code a bit, and have DataInterface as a factory pattern that returns an object, then we can achieve the same result but without the new keyword.

1
2
3
4
5
6
7
8
9
10
11
12
13
14
15
16
17
18
var DataInterface = function() {
    return {
        endpoint : '',
        setEndpoint : function(_endpoint) {
            this.endpoint = _endpoint;
        },
        getEndpoint : function() {
            return this.endpoint;
        }
    };
};

var ProposalService = DataInterface();
var ProductService = DataInterface();
ProposalService.setEndpoint('one');
ProductService.setEndpoint('two');
console.log(ProposalService.getEndpoint());
console.log(ProductService.getEndpoint());

You will now get the output of ‘one’ and ‘two’ in the console, and we did not rely on the “new” keyword.

Just a handy little snippet of code to remember how to not use “new” in javascript when creating instances.

Scaffolding notes on django

Setup notes

Make sure the following is installed:

  • python
  • pip
  • virtualenv

Create a virtual environment:

1
eg: virtualenv env

Make sure django is installed:

1
pip install django

Scaffolding notes:

Create a project:

1
python-admin startproject [projectname]

Optionally create an app

1
2
3
cd [projectname]

python-admin startapp [appname]

Note! Make sure you cd into the project folder so that your app is in the same folder level as manage.py

Also remember to:

Add [appname] to INSTALLED_APPS in settings.py

Create a temp directory with ansible on your local computer

I have a linux environment set up, and I have ansible installed. To see how to setup ansible from scratch follow this blog entry:

Setting up ubuntu linux for ansible development

Some tips that helped me while I was researching ansible

(I’m still learning so this may or may not be right, use it more as stepping stones to progress your own knowledge)

Yml

Ansible makes use of .yml files. Pronounced “yeah-mil”. These files are indent sensitive and you seperate commands be new lines and indents. If you are unfamiliar with yml structures I suggest googling a bit for more information on yml files are structured.

Hosts

There is a global ansible hosts file.

/etc/ansible/hosts

However I always recommend against editing global files. Setup a local inventory file rather.

In your hosts files you declare host level variables that indicate the addresses/locations you would like to access and alter from.

Playbooks

A playbook defines individual plays to be executed in a predefined order

Play

A play is a single task or action to be execute

Modules

A play can use modules to achieve tasks or actions

Lets get started with a simple ansible script to create a directory

Go to a new directory where you would like to create the ansible script and create a folder called “practice”.

In this folder create a yml file called “test.yml”.

Note you can name the yml file anything you like, I’ve just chosen test for this example.

Then create an inventory folder for you hosts file. In the inventory folder add a “hosts” file (no extension).

1
2
3
4
practice/
    inventory/
        hosts
    test.yml

Add hosts

In your “hosts” file add the following:

1
2
[local]
localhost ansible_connection=local

This indicates a variable “local” with the value localhost ansible_connection=local. This tells ansible that you are working on your local machine.

Point to local in test.yml

Add these lines to your test.yml file in order to run your first ansible command.

1
2
- hosts:
  - local

You can check that ansible picks up this configuration by running:

1
<p class="p1">ansible-playbook -i inventory/hosts test.yml --list-hosts</p>

And you should get the response:

1
2
hosts (1):
    localhost

The -i refers to:

-i INVENTORY, –inventory-file=INVENTORY
specify inventory host path
(default=/etc/ansible/hosts) or comma separated host
list.

Then the inventory/hosts indicates the “hosts” file you created in the inventory directory.

The all indicates that all the listed hosts will be displayed. You could also say:

1
ansible-playbook -i inventory/hosts --limit localhost test.yml --list-hosts

And that would filter to just the “local” section. In this case it would return the same result:

1
2
hosts (1):
    localhost

The playbook

Lets start adding a task. Open your test.yml file in you practice folder, and add the following lines:

1
2
[local]
localhost ansible_connection=local

This indicates the environment you wish to alter. Run the playbook:

1
ansible-playbook test.yml -i inventory/hosts

If you get this message:

skipping: no hosts matched

Just make sure you indicated the “-i inventory/hosts” part.

Add tasks

Now we will begin adding the task of creating a new folder. We will be making use of an ansible module called “file”.

Add the following code to your test.yml file:

1
2
3
4
   
  tasks:
    - name: create a dir called temp
      file: path=temp state=directory mode=0755

“name” is referring to the name of the task, this will display in the response on the command line

“file” is the module you are using, and then path, state and mode are configuration values you set for the task

You should now have in your test.yml file:

1
2
3
4
5
- hosts:
  - local
  tasks:
    - name: create a dir called temp
      file: path=temp state=directory mode=0755

Run your ansible playbook

1
ansible-playbook test.yml -i inventory/hosts

You should now see a temp folder inside your practice folder you created.

And that’s it. As simple as that.

Experiment with more file modules

http://docs.ansible.com/ansible/list_of_files_modules.html

Creating angularjs directives in fiddle

A great way to test an angular directive concept out outside of a project is to set up a sandbox version in jsfiddle.

Go to jsfiddle.net

Laying down the foundation for angular js code in fiddle

HTML

In the html block add:

1
<div ng-app="myApp"></div>

fiddleHtml

Note: ng-app=”…” can be any value you choose, I just chose “myApp”

Javascript

Then in the javascript block add:

1
angular.module('myApp', []);

fiddleJS

Your module is the name you chose to use as your app name, I chose “myApp”.

Also make sure your javascript settings are set. I set mine to the following:

Language
Javascript

Frameworks & Extensions
Angular JS 1.4.8

Load Type
No wrap – in <head>

fiddleJSSettings

Use console to track errors

Open your console. To do this on a windows pc you press F12, and a console tab opens at the bottom (or side) of the screen. Make sure you are viewing the “console” tab.

Keep your eye on the console tab for any errors. At this point you should not see any errors, if you do, go through the steps above again. You want to proceed with no errors so it makes it easier for you to debug your directive.

Tip: You can also use console.log like normal to track manual logs while you are coding.

Click the “run” button to the top of your screen and check that no errors occur in the console tab.

fiddleRun

Setting up your directive

Add the directives namespace at the top of the javascript code and add the namespace to the app declaration:

1
2
3
angular.module('directives', []);

angular.module('myApp', [<strong>'directives'</strong>]);

You should run your code, check no errors occur and proceed.

Let’s set up a simple display directive with just a sentence to be displayed.

Simple angular js directive with a tempalte

You can create directives with html internally in the js script.

In the javascript block add the following

1
2
3
4
5
6
angular.module('directives', []).directive('display', function(){
    return {
        template: 'This is just a display'
    }
});
angular.module('myApp', ['directives']);


In the html block add the following:

You can run the project now and in the bottom right you should see the sentence “This is just a display”.

fiddleDisplay


Done

That’s it. Now you can expand on your directive, look at some examples on the angular js documentation and try out more advanced directives. Add controller, link functions and template urls.

Here is the fiddle link if you would like to see it in action:

https://jsfiddle.net/cari_za/7115oy9z/1/